1. How do I measure an o-ring?
2. How do you measure the inner diameter (ID) of an O-Ring?
3. How do you measure the cord thickness (CS) of an O-ring?
4. How do I measure the Compound of an O-ring?
5. How do you measure the rubber compound of an O-Ring?
6. How do you measure the hardness of an O-Ring?
7. How do you install an O-ring?
With an O-ring there are 2 dimensions that are important to know whether you have the right size. How do you know what dimensions to measure? How do you know if you measure the dimensions correctly?
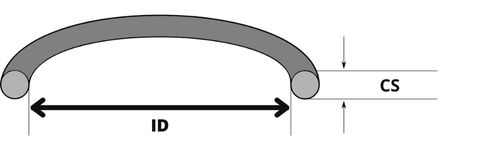
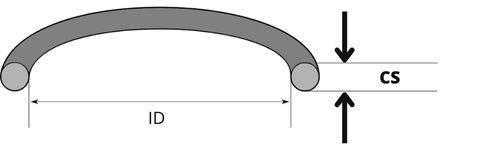
There are two sizes that you should measure properly: the Inner Diameter (inner size) and the Cross Section (Thickness).
You measure the inner diameter of an O-ring by measuring one side of the inner side to the other side of the inner side (see the video). You therefore do not measure from the outside, because then you measure a size that is much too large. When you measure this you have to be careful not to measure too far, which is easy. This makes it very easy to get confused about the size.
The Cross Section of an O-ring is easy to measure. You simply measure how this is the cord of the O-ring. You do this by going from one side of the cord to the other side of the cord (see the video).
An O-ring is available in different materials. In addition, these metals have different hardnesses. How do I know what material an O-ring has? How do I know the hardness of my O-ring?
To measure the material of an O-ring, it is best to use a Roconize Tool. With a Reconize Tool you let a piston bounce on the rubber of the O-ring. How high the piston bounces back shows what gauge the O-ring is (see the video). The Reconize tool can only be used with O-rings with a hardness of 70 shore. If you have an O-ring with a different hardness, it is best to have your O-ring tested by us or another factory.
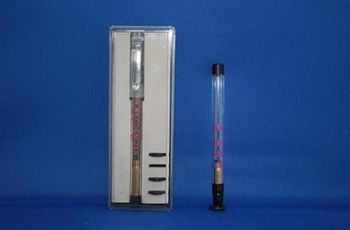
* The Reconize Tool is only an indicator, the indication may differ.
It is best to use a Durometer to measure the hardness of an O-ring. A Durometer measures the exact hardness of an O-ring. A Durometer has a pin that you push against the rubber. You will see a number appear on the screen that indicates the hardness of the rubber (see the video).

* Please note, for rubber you need Durometer Shore A. This one is for rubber!!
O-rings are a crucial component in many mechanical systems, as they serve as seals that prevent the escape of fluids, gases, and other substances. Installing them correctly is important to ensure a leak-free performance. In this article, we'll go over the steps for installing o-rings properly.
1. Clean the Surface
The first step in installing o-rings is to clean the surface where they will be placed. Dirt, debris, and other contaminants can cause the o-ring to become damaged or misshapen, leading to leaks. Clean the surface with a solvent or soap and water, and make sure it is completely dry before installing the o-ring.
2. Choose the Right O-Ring
Before you start installing o-rings, you need to choose the right size and type of o-ring for your application. O-rings come in a variety of sizes and materials, so it's important to choose the right one for your needs. Consider factors such as temperature, pressure, and fluid compatibility when choosing an o-ring.
3. Lubricate the O-Ring
Before installing the o-ring, it is important to lubricate it to reduce friction and prevent damage during installation. A silicone-based lubricant is recommended for most applications. If the o-ring is to be installed in a high-temperature or high-pressure environment, a more specialized lubricant may be required.
4. Install the O-Ring
Once the surface is clean and the o-ring is lubricated, it's time to install it. Start by positioning the o-ring in the groove or channel where it will be seated. Ensure that the o-ring is centered in the groove and that both ends are equally spaced. If the o-ring is too tight in the groove, you may need to stretch it slightly to ensure that it fits properly.
5. Squeeze Out Any Air Bubbles
After the o-ring is positioned in the groove, squeeze out any air bubbles that may have formed. Air bubbles can cause leaks and decrease the effectiveness of the o-ring, so it's important to eliminate them. To do this, gently press down on the o-ring with a flat tool, such as a flat screwdriver or a rubber mallet, to force out any air bubbles.
6. Check for Leaks
After the o-ring has been installed and any air bubbles have been eliminated, check for leaks. You can do this by applying pressure to the system and observing for any signs of a leak, such as fluid escaping from the area where the o-ring is installed. If a leak is present, you may need to remove the o-ring and start the installation process again.
7. Repeat the Process
Repeat the process of installing o-rings for any other locations where they are required. Be sure to follow the same steps for each installation to ensure a leak-free performance.
In conclusion, installing o-rings correctly is an important step in maintaining the performance and efficiency of many mechanical systems. By following these steps, you can ensure that your o-rings are installed correctly and will provide a leak-free performance. If you have any questions or concerns about installing o-rings, consult with a professional or refer to the manufacturer's instructions.
Do you have further questions about Oil Seals? Feel free to contact us!!
Questions about O-ring materials? Find everything about O-ring materials here!
Questions about O-ring resistance? Find everything about O-ring resistance here!